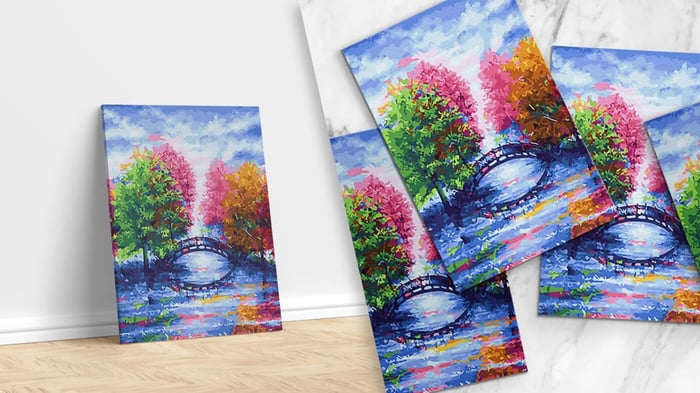

In this modern age, artists can make extra money by selling and transforming their physical paintings into prints. It is the best solution if an artist needs quick cash. Knowing how to perform this task accurately is essential, whether you are a beginner or inexperienced. Today, we share the entire process of changing your physical artwork into a high-quality print so that it can quickly be marketed and sold.
Let's explore how you can turn your physical painting into high-quality prints.

Taking a Picture
Taking a photo is one of the most popular and cost-effective ways to convert your physical artwork into printable images. To get better and clearer results, you should select a well-lit area. You can choose an open, cloudy, or precise location for appropriate space, or create a bright studio by setting up some high-quality LED lights. The quality of the pictures depends on various factors, such as the location where you are taking the photo, the photographer's expertise, and the camera's quality. However, if you cannot afford expensive cameras, you can still take solid pictures with your iPhone.
...or Use a Scanner

Another way to convert your physical photography to digital is by using a scanner. It can give precise and high-resolution results effectively. You must choose a high-quality scanner for high-resolution photos to get the appropriate result. Epson Perfection Scanner is ideal for this purpose. Place the painting on the scanner bed correctly to get the desired result. If your painting is larger than the scanner bed, divide it into sections. Before starting the process, you must adjust the scanner settings, such as setting the resolution to more than 300 dpi and changing the color for accurate and high-quality reproduction. Photo editing software like Photoshop can also merge different scanned photo sections.
Adjusting the Image
For those familiar with Adobe Photoshop, this step may not be necessary. However, we recommend learning the basics of this popular graphics software, as it allows you to trim, crop, and adjust colors to enhance your artwork.
It provides an opportunity to resize the art or to crop it to the perfect image size of 11x14. This software can be adjusted for saturation, light, and dark areas, and vibrance is tweaked to increase visual appeal. You can review whether the edited image meets the standard or needs further modification.

It's important to edit the JPEG image to ensure the colors are as desired, the whites are indeed white, and the shadows and dark areas are accurate. Here are the primary modifications I make:
- I resize the image to a 'standard size.' In my case, this is 16x20".
- I eliminate the shadow and exterior edges of the scanned image.
- I clean up any undesirable blemishes or paint splashes on the print.
Ensuring High-Quality Resolution
Once you have the print file, it's essential to check whether its resolution meets the standard requirement. The print must be at least 300 dots per inch or more. If your image exceeds the recommended size, you must resize or crop it to match the desired result. In Adobe Photoshop software, you can check the size and resolution of the images by clicking on "Image" or "Image size," respectively. It's essential to remember that the image's resolution determines its quality. Lower-resolution photos may result in blurry and pixelated prints. On the other hand, high-resolution images can be sold at a higher rate, giving the feel of original artwork.
Test Printing
Test printing is an essential step before selling your print to the market by revising the quality of your print. Whether you are printing at a commercial level or home is crucial in both scenarios. It helps analyze your print quality result and suggests necessary changes. It also analyzes the level of color transitions. Remember that the print quality shown on the screen is no different from that in the print form. So, you must keep a physical copy of your print to showcase the exact result. This physical print is necessary to build trust during partnership and business.

Creating Custom Stickers from Your Digital Artwork
Once you've successfully digitized your artwork, another fantastic way to broaden its use and reach is to turn it into custom vinyl stickers. Stickers provide a fun and cost-effective way to share your work with a wider audience, and they are easy to produce.
Stickers are easy to produce and loved by just about everyone. This artwork should be simple in design to convert a clear message into small print. When you finalize your design, it's time to define the size and shape of the stickers, such as square, rectangular, rounded shape, or custom die cuts, to showcase your artwork in a sophisticated design that attracts the audience. In short, this entire process changes the artwork to a small print sticker with great versatility.
And Finally...
Congratulations! You now have the knowledge and steps to turn your physical paintings into sellable prints.
We have provided detailed insight on converting your physical painting into print to upscale your business and get high-quality photographs, prints, etc. You can also digitize your physical painting into versatile stickers that a broader community loves. Read the entire article attentively to be equipped with the knowledge to get the high-resolution result of the prints in the recommended size.