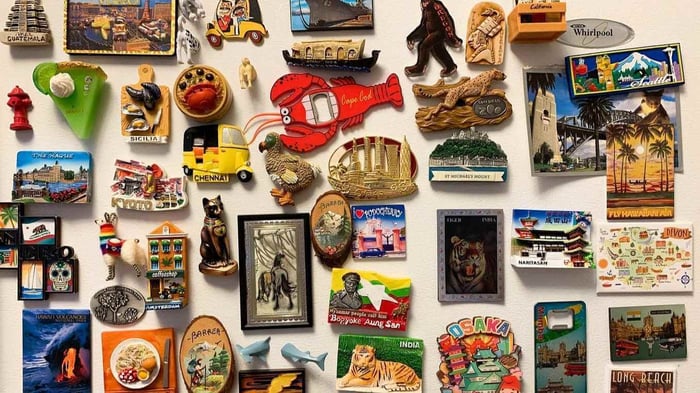
Transforming stickers into magnets is a creative craft that repurposes and extends the life of stickers, making them reusable and versatile as decorative items or functional tools. This process is simple and accessible, requiring minimal materials and no specialized skills.
It is an ideal activity for craft enthusiasts of all ages. Magnetic stickers can serve multiple purposes, from decorating refrigerators and lockers to creating educational aids and personalized gifts. The essence of this craft lies in its blend of simplicity, creativity, and practicality, offering a unique way to cherish and display favorite stickers in a new format.
Materials Needed
The materials required for converting stickers into magnets are straightforward and easily obtainable. The primary component is a magnetic sheet, the base to which the stickers are attached. These sheets are available in various sizes and can be either pre-adhesive or plain, necessitating the use of glue. Scissors or a cutting tool are needed to trim the magnetic sheets and stickers into the desired shapes and sizes.
It's important to select magnetic sheets that are thin enough to be cut easily but strong enough to hold the sticker firmly in place. This balance ensures that the final product is both aesthetically pleasing and functional.
Step-by-Step Guide
Step 1: Prepare Your Workspace
Lay out all materials on a clean, flat surface. This provides a good overview and helps plan sticker placement to minimize waste.
Step 2: Plan Your Layout
Before attaching anything, position your stickers on the magnetic sheet to maximize space. This step is crucial for efficiently using your materials. It can involve some puzzle-like arrangement to fit as many stickers as possible.
Step 3: Attach Stickers to Magnetic Sheet
- For Pre-Adhesive Sheets: Peel off the backing and press the stickers onto the magnetic surface.
- For Non-Adhesive Sheets: Apply a thin layer of glue to the back of each sticker, then place it on the magnetic sheet. Ensure it's evenly pressed down to avoid air bubbles.
Step 4: Cutting Out Your Magnets
Once the stickers are firmly in place, use scissors to cut around the edges of each sticker. Aim to follow the contours closely for a clean, finished look. For more intricate designs, proceed with extra care to maintain the integrity of the design.
Step 5: Precision Cutting Techniques
- For simpler shapes, a straightforward cut around the edges will work.
- For intricate designs, consider cutting inside outer borders to make the task easier and provide a more aesthetically pleasing margin around the sticker.
Step 6: Final Touches
Inspect each magnet for rough edges that can be smoothed with a more precise cut. If stickers are lifted from the magnetic sheet, a small amount of glue can be applied under the edges to secure them.
Step 7: Enjoy Your New Magnets
Your sticker magnets are now ready to be displayed on any magnetic surface. Experiment with different placements and arrangements to enjoy your handiwork.
Creative Ideas
Once crafted, sticker magnets open the door to many creative uses and applications. They can be used to personalize spaces like workstations, kitchen appliances, and school lockers, adding a touch of individuality and flair. Educational themes can transform these magnets into learning tools for children, incorporating alphabets, numbers, or science concepts into playful, interactive experiences.
Sticker magnets can be crafted as personalized gifts, offering a unique and custom-made present for friends and family. The possibility of creating themed sets or collections, such as holiday decorations or favorite characters, further expands the creative potential of this craft. This versatility enhances the utility of sticker magnets. It enriches the crafting experience by allowing for endless experimentation and personal expression.
Maintenance and Care
Maintaining the quality and appearance of sticker magnets is straightforward. They should be kept away from direct sunlight and extreme temperatures to prevent fading and warping. If the magnets become dirty, a gentle wipe with a damp cloth can remove most surface dirt without damaging the magnet or sticker. Storing them in a cool, dry place when not in use will also help preserve their magnetic strength and visual appeal. The simplicity of care ensures that these crafted magnets can be enjoyed for a long time, retaining their charm and functionality.
Converting stickers into magnets is a simple, enjoyable craft with practical outcomes. It encourages creativity, recycling, and personal expression, making it a fulfilling activity for individuals and families. Whether for decoration, education, or gifting, sticker magnets offer a unique way to repurpose and enjoy stickers in a new, lasting form.