
Wedding planning has a talent for making simple things feel complicated. You’re comparing prices, juggling opinions, and trying not to blow the budget on items that end up in a keepsake box. Invitations are one of those items. You want them to look good, but you also want to keep it moving. If you’re aiming for easy wedding invitations, you do not need a custom stationery package or a home printer that jams whenever you’re in a hurry.
A cleaner option is to treat invitations like a print project you control. You pick the design, export it correctly, and order prints on real cardstock. No back and forth. No “custom suite” pricing. Just your file, your choices, and a result that feels polished.
In this guide, I’ll walk you through a simple way to print wedding invitations using Custom Stickers. You’ll upload your own design, choose a size and cardstock, and pick finishes that match your style.
Choose or Create Your Invitation Design (Canva, Photoshop, or Etsy)
There are three common ways couples end up with an invitation design, and all three can work. The best choice is the one that fits your comfort level and your timeline.
If you want something beginner-friendly, Canva is usually the smoothest path. You can start with a blank layout or a template, then change fonts and spacing without wrestling with advanced tools. The key is setting the invitation size first. When the file starts at the correct size, everything stays sharp and proportional.
If you’re comfortable in Photoshop, you get more control over photos, typography, and spacing. Just keep print in mind. Use high-resolution artwork, avoid tiny type, and leave safe space near the edges so nothing feels cramped after trimming.
The third option is the “fast but still polished” route: a digital template from Etsy. Many templates are made to be edited in Canva or similar tools, so you can plug in your details, download a print-ready file, and be done.
No matter which route you take, a few basics will save you from redoing work later. Start at the correct size, export in a print-friendly format, and save the front and back as separate files if you’re printing both sides.
If you’re not sure why some files look crisp and others look fuzzy, the Custom Stickers post on raster and vector images explains it in plain language. You do not need to master design software to get a clean print.
Uploading Your Invitation Design to Custom Stickers
Once the design is done, the ordering part is mostly about matching details. This is where people expect it to get complicated, but it’s actually the calmer step, especially compared to printing at home.
Export your invitation front as its own file. If you have a back side, export that separately. Keep the names obvious so you do not accidentally swap them.
Next, go to the product page that’s set up for this workflow: Print Invitations from Etsy. Upload the front and back designs, then choose the matching print size.
Size matching matters more than people think. If your file is built at 5 x 7, select 5 x 7. If your file is built at 4 x 6, select 4 x 6. When those two match, your invitation prints as expected, without surprise cropping or awkward scaling.
After that, it’s mostly choosing how you want the invitation to feel in hand. If your file is sized correctly, the rest is straightforward, and you’re well on your way to easy wedding invitations that still look like you put thought into them.
Customize Printing Options for Easy Wedding Invitations
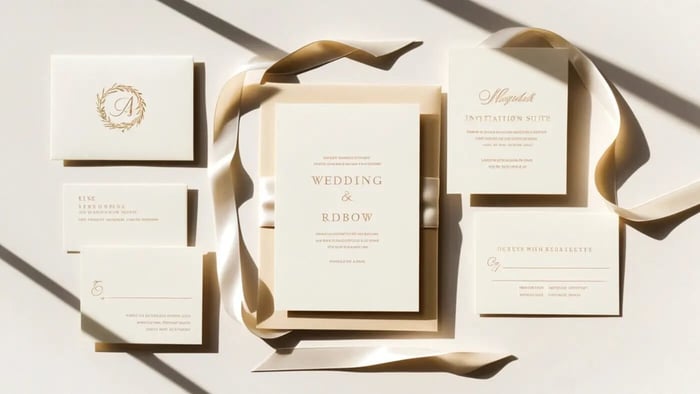
This is where your invitation goes from “nice design” to “oh wow, this feels real.” Paper, thickness, and finishing choices change the whole impression, even when the design stays the same. The trick is to keep your decisions simple.
Cardstock thickness is usually the first place people get stuck. A 14pt cardstock tends to feel sturdy and classic, and it works for almost any invitation style. If you want a thicker, more premium feel, 16pt is the upgrade you notice right away when you pick it up. If you want a quick primer on paper weight and thickness terms, this cardstock paper guide is helpful.
Size is both a style choice and a practical one. A standard size is easier to pair with envelopes, and it keeps your text readable. If you’re trying to include a lot of details, consider double-sided printing so the front can stay clean.
Quantity is where you give yourself breathing room. Order what you need for your guest list, then add extras for last-minute additions and the inevitable envelope-stuffing mistakes.
Single-sided works when the invite is mostly date, time, and location. Double-sided makes sense when you want to include extra info like a weekend schedule, travel notes, or a small map without adding insert cards.
Corner style is a small detail that changes the vibe. Rounded corners feel softer and more modern. Square corners feel crisp and traditional. Pick the one that matches the design you already have.
Finish is the final layer. Matte looks clean and reads well under bright light. Gloss can make colors pop more, especially with photos. If you want invitations to photograph well without glare, matte is usually the safer bet.
Why This Is an Easy (and Affordable) Wedding Invitation Option
Traditional custom invitation ordering can be beautiful, but it can also be slow and expensive. You often go through rounds of changes, you wait for proofs, and the cost climbs as you add upgrades. That’s fine when that experience is the point. But a lot of couples just want invitations that look good and don’t become a whole project.
Printing this way keeps you in control. You decide the design, you proof the wording before you upload, and you pick the print options that fit your budget. There’s less back and forth, and you’re not paying for customization you don’t actually need.
It also scales well. Small weddings benefit because you can order exactly what you need. Large guest lists benefit because costs stay more predictable. Destination or casual ceremonies benefit because you can keep the invitation simple and send guests to a website for the details.
And if you want to add personality later, you still can. Couples often print invites first, then add custom stickers for envelope seals, address labels, or small detail stickers that tie the look together. It’s a practical way to keep easy wedding invitations feeling personal.
Conclusion
Easy wedding invitations come down to a simple sequence. Choose or create your design, export it correctly, upload it, then pick your cardstock and finishing options.
Try not to overthink the “perfect” invitation. Your guests want clear details and a hint of the vibe. When you keep the process simple, you save money and you keep your planning energy for the parts of the wedding you’ll actually remember.